Launched: Zebra’s new Support Center is now live. Discover a smarter, faster support experience!
ZD611 Desktop Printer Support
MODELS: ZD611T, ZD611D, ZD611R
Retain proof of purchase for warranty confirmation.

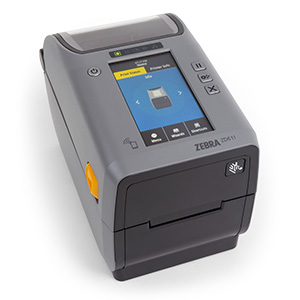
ZD611T Thermal Transfer Printer

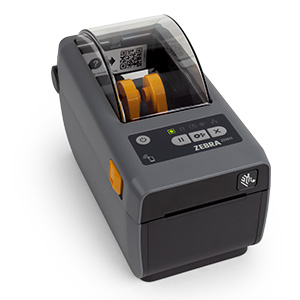
ZD611D Direct Thermal Printer
ATTENTION - Zebra Printer Customers in Europe, the Middle East, and Africa.
Recent changes have been made to the printer setup process - Learn More.
- Getting Started
- Downloads
- Documentation
- Videos
- Troubleshooting
- Application Software
- Additional Resources
The Setup guidelines below will take you to English documentation. You can access the localized User Guides in the DOCUMENTATION tab.
IMPORTANT! Do not connect your printer to a computer yet!
- If you connected your printer to a computer via USB before driver installation, the printer might appear as an unknown (unspecified) device in “Devices and Printers.”
- If necessary, follow these recovery steps before proceeding to Step 1.
IMPORTANT: You will need a roll of media (labels, receipt paper, tags, etc.) to set up your printer. See the Zebra Web site or contact your reseller to help you select the right media for your use. Find media at zebra.com/supplies.
Install the Zebra Printer Driver First
1. Download and install the recommended Windows Printer Driver v10
- Download the driver from the DOWNLOADS tab.
- Follow the instructions in Installing the Drivers to pre-install the drivers. Pause the driver installation with the drivers preinstalled. Proceed to Step 2. The driver installation can be completed after you Print a Configuration Report to Test Printing and connect the USB cable to the system.
For Steps 2-9, you may watch the following printer video: Setup.
2. Place the printer in a safe location with access to power and where you can connect with interface cables or wirelessly to the system.
3. Attach the power supply to the printer and a grounded power source. See Attaching Printer Power.
4. Load media. Typically, this is a roll of labels, receipt paper, or tags. See How to Load Roll Media.
- The media settings must match the actual media that you are using. See How to identify media type on the Zebra website.
- For label and receipt (continuous) media roll, see Adjusting the Movable Sensor for Web/Gap Sensing.
- For label and receipt (continuous) media roll, see Adjusting the Movable Sensor for Black Marks or Notches.
5. Load ribbon if you are printing on thermal transfer media. See Using Thermal Transfer Ribbon in the Printer and Loading Zebra Transfer Ribbon.
- The media settings must match the actual media that you are using. See How to identify media type on the Zebra website.
6. Turn the printer ON. The USB cable should not be connected to the computer!
7. Calibrate media properties and label positioning. See Run a SmartCal Media Calibration.
8. Print a printer Configuration Report as a test print. See Print a Configuration Report to Test Printing.
- Use the Configuration Report to find your printer's model, print resolution (for example XXX dpi), programming language (typically ZPL, CPCL, and EPL), and alpha-numeric serial number at the top of the printout.
- Use the report to set and configure the printer for various printer communication options (USB, Wi-Fi, Ethernet, and Bluetooth.
9. Turn the printer OFF.
10. For USB printer communication ports, connect the supplied USB cable to the printer. Turn the printer ON.
11. For non-USB printer communication ports, run the Windows Printer Driver v8 previously used to preload the drivers. The driver executable file (such as zd86423827-certified.exe) was added to your Download folder. See Running the Printer Installation Wizard.
12. Turn the printer ON when instructed.
- Windows should automatically detect and configure your printer for USB port operations.
- Network (Ethernet and Wi-Fi), Bluetooth, and Other (serial port) will require additional setup. Follow the on-screen instructions and prompts to complete the wizard.
- The printer can connect to multiple uniquely named ports.
13. Use Windows Printers & Scanners. Access it with the Windows search bar. Right-click on your displayed Zebra printer and configure your printer. Select Print a test page to verify printing form the computer.
Legacy Windows OS’s use the Control Panel to select Devices & Printers. Access it with the Windows search bar. Right-click on your displayed Zebra printer and configure your printer. Select Printer Properties to access the Print Test Page.
Use Printers & Scanners (or Devices & Printers) to manage printer and communication settings from Windows. The printer settings must match the actual supplies that you are using for your print job and the options on your printer.
You can use the Zebra Setup Utilities (ZSU) to manage Zebra printers (only) and configure them for your media and ribbon. The ZSU has a variety of wizards, test functions, command line, fonts, and communication tools to assist you with setup and if you need it troubleshooting.
Documentation
Some documents may not have been translated to your language.
Oops!! Something went wrong. Please try again.
ZD611 How-to Videos
Application Software
Zebra software products that can enhance your experience with this device.
Oops!! Something went wrong. Please try again.
Additional Resources
Useful links and resources to enhance your experience.
Support Content
Join our community discussion forum where you can connect with Zebra users and ambassadors from around the globe.
Warranty and Repair
For some services, you will need a serial number. Here's where you can find it on your device.
Find the Serial Number of Your Zebra Product

